Good morning, readers! No Swatch Saturday this week, today is still part of the September Spectacular with The Digit-al Dozen!
Today’s throwback theme is Love and Heartbreak. I decided to try out a technique I’ve seen a few times. I saw it first in this guest post by Honeymunchkin on My Nail Polish Obsession and she referred to it as a “pond manicure.” From what I understand, this post by Olive View Fashion was the original “pond manicure” and I’ve loved seeing all of the variations on many blogs! And I have to try the flower version soon as well!
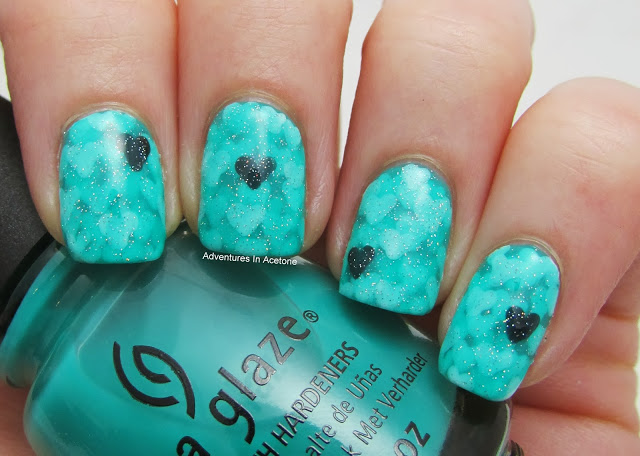
So here is my attempt at a pond manicure, but using hearts like Honeymunchkin did. I threw in a few black hearts with the white ones for the “heartbreak” part of the theme.
Here is how I did it:
- I applied one coat of China Glaze Keepin’ It Teal.
- Once that was dry enough, I took a small dotting tool and white polish to make some heart shapes.
- I then layered another coat of China Glaze Keepin’ It Teal.
- Once that was dry, I repeated the steps of adding the white hearts overlapping the other layers and doing the China Glaze Keepin’ It Teal jelly in between the layers.
- I added a random black heart on each finger in the top layers before the final jelly layer.
- Finally, I thought I would add some sparkle with China Glaze Fairy Dust and then some HKGirl Top Coat.
document.write(‘
If you enjoyed this post, please Sign Up for email updates and you will have the latest news, reviews, nail art, and tutorials delivered right to your inbox! Never miss a post from Adventures In Acetone again. Thank you so much for reading.
– Let’s paint something amazing! –


Comments
lovely <3
Oh my! This is brilliant! The heart sammy looks so cool! And then the one black heart….fantastic! 🙂
That is so cool!! Love it!
Wow, love it!
I love this! I'll have to try this sometime!!
this is astounding. I don't think I've ever seen a mani quite like it!
Looks amazing 🙂
Amazing idea ! I love the depth, so gorgeous !
so pretty manicure
These are absolutely gorgeous! I'd never heard of this technique before, but I'll try it soon!
Looks awesome!
This looks stunning!:)
Great post, thanks for sharing!:)
I am currently running a giveaway on my blog if you want tot check it out?..
http://polkaanddots.blogspot.co.uk/2013/08/100-followers-giveaway.html
Hugs, Brittany, xx
http://polkaanddots.blogspot.co.uk/
Oh wow, I wouldn't have thought of this!
One of the more original manis I've seen lately, definitely.
i must remember to do this technique and SOON!
I WANT TO DO THIS! Thank you for such an thorough tutorial..you make everything seem so easy..AND IT IS as long as YOU'RE the tutor! <3
I love these so much! They look fantastic. <3
this just takes my breath away – it's just perfect, absolutely perfect xx
I LOVE this! have to try it out 😉
This is just beautiful! I will have to try this out!
this is definitely one of the coolest ideas i have ever seen!! there is soooo much depth, you totally killed it!
I LOVE this! The ultimate jelly sandwich 🙂
My 11yo son hopped up on the bed while I was looking at this and he thought it was awesome 😉 I've been teaching him about different polishes, so I told him how you did this and he understood lol. Trust me it's a big deal that he liked this 😉
WOW what a cool look, this is gorgeous!
This is my FAV of the day!
This layering is such a cool technique! I love the buried effect it gives :).
wow very beautiful