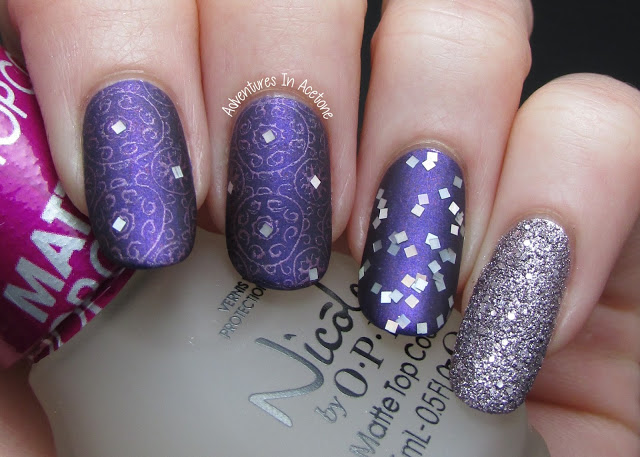
For this mani:
- I used a base coat of Nicole by OPI 3-IN-1 Base, Top Coat, and Strengthener on all nails.
- On all fingers but my pinkies, I painted 2 coats of Nicole by OPI Aren’t Families Grape?
- My pinkies got 2 coats of OPI Baby Please Come Home. I love having textured accent nails.
- My ring fingers and thumbs then each got 2 coats of Nicole by OPI Spark The Conversation.
- Next, for my index and middle fingers, I used a coat of Nicole by OPI Quick Dry Top Coat to help speed up the stamping process. Once that was dry, I used China Glaze Harmony to stamp on the Lily Anna 08 plate image design.
- Then, I used a toothpick to place a few of the silver squares on the image from Nicole by OPI Spark The Conversation. I topped those stamped nails with a careful coat of Nicole by OPI Quick Dry Topcoat.
- Lastly, I painted one coat of Nicole by OPI Matte Top Coat on all nails but the pinkies.
What do you think of this mani? I just love skittlettes and this one has texture, glitter, matte, and stamping all in one! So fun!
Nicole by OPI is releasing 4 top coats and treatments in 2014. Read the Press Release for more info. I have all 4 to review for you in today’s post. Below is a photo of the 4 top coats and treatments:
Matte Top Coat: The matte top coat worked really well! It applied easily and dried quickly to a matte finish. I really love the look of matte top coat over all things! Glitter looks especially fun after a matte top coat.
Quick Dry Top Coat: This did dry fairly quickly! Unfortunately, this won’t be good for nail art (maybe if it is completely dry) because it pulled some of the dark purple base onto the bristles so I know it would smear through nail art. It is a great top coat for solid colors though. I did use it over the stamping very carefully and it didn’t ruin it, so maybe if you are careful!
3-in-1 Base, Topcoat, and Strengthener: This is a great base coat because it strengthens and protects the nail and is thin enough that it dries by the time you want to paint your first coat of color over it. As a top coat, it is thinner than the Quick Dry and isn’t a quick dry but it really doesn’t take that long to dry since its thin. It also pulled base color onto it’s bristles, though, so I don’t recommend topping nail art with this one either. I love the ease of it being a 3-in1 and think it would be perfect for traveling, or keeping on a desk at work if you change your nails or touch up often.
Oil To Go: This is just fabulous! I will warn you, it has a faint tropically sweet scent that I love! But if you are sensitive to things like this on your hands, you may want to steer clear. If scents don’t bother you, read on with my step by step photos! This applicator is really awesome and reminds me of those lip glosses you could buy years ago that you squeeze and the gloss comes out in the middle of the bristles. I love the fact that I don’t have to dig my nails into a tub and that it’s one handed application instead of a bottle that comes with a brush (like a mini nail polish bottle). It absorbs well after you rub it into your cuticles and nails. I’d say, after 10 minutes, it isn’t greasy or shiny but your skin and cuticles are nicely moisturized. Definitely LOVE this product and it stays in my purse for use all the time!
When you squeeze the tube, the cuticle oil gel comes from the middle of the bristles.
Then, just paint it on the cuticles and skin around the nails! If your nails are bare, you can paint it onto the nails as well!
If you enjoyed this post, please Sign Up for email updates and you will have the latest news, reviews, nail art, and tutorials delivered right to your inbox! Never miss a post from Adventures In Acetone again. Thank you so much for reading.
– Let’s paint something amazing! –


Comments
Great mani and review!! I love all the detail you went into! ♥
Wow, this nails are definetely the best I've seen this week!
I love them and all the details look great on your nails 🙂
I want all the details you can give, thank you!
lovely manicure, again! 🙂
A beautiful manicure!