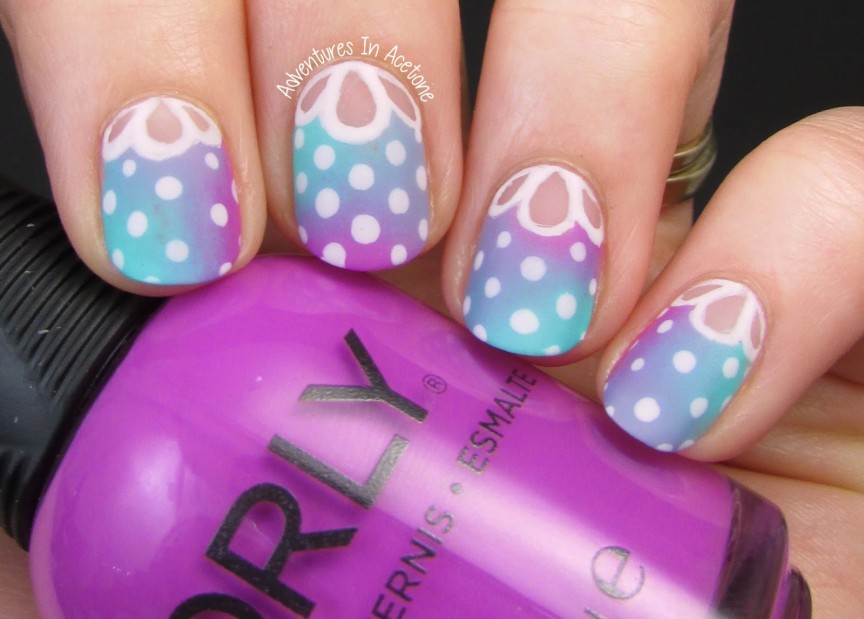
Good morning, readers! Floral Week with The Digit-al Dozen continues, and for Day 2 I’ve stretched the theme a bit. Floral lace shapes for the half moon part of this mani totally count for floral, right?
I was inspired by this mani on instagram by @deanne29 (who added dots to the original design by @Kayleighwaleynails ). Looking at the mani, the hardest part of the design would be the floral lace half moon cut out at the cuticle line. However, I grabbed my trusty Liquid Palisade and it was a breeze! I’ll be putting a quick video on Instagram today of how I did it, and you can see a quick picture step-by-step below as well.

- To begin, I used Liquid Palisade and painted the floral cut out shape onto the nail, and then around my nail to protect the skin from the gradient sponging. I let it dry completely.
- Next, I painted Orly Frolic, Barry M Green Berry, and KBShimmer Hugs and Wishes onto the makeup sponge. I dabbed onto the nails about 4-5 times each, and I rotated the sponge on the next nail so the colors would be in different spots.
- Once the gradient was opaque enough, I used tweezers and pulled the Liquid Palisade off to reveal clean skin and the floral cut out.
- I used acetone and my cleanup brush from Jolie Polish to get any excess polish off of the skin.
- I then used a thin nail art brush and OPI My Boyfriend Scales Walls to carefully paint the floral petal shapes.
- I used a small dotting tool and OPI My Boyfriend Scales Walls to add the polka dots.
- One coat of HK Girl Top Coat was then used to seal it in and help dry the design.
- Lastly, I added one coat of OPI Matte Top Coat because I am obsessed with mattified nail art lately.


If you enjoyed this post, please Sign Up for email updates and you will have the latest news, reviews, nail art, and tutorials delivered right to your inbox! Never miss a post from Adventures In Acetone again. Thank you so much for reading.
– Let’s paint something amazing! –

Comments
how pretty !
gorgeous manicure
Very nice! <3
this is so cool 🙂
This is gorgeous! I have recreated this mani as well, but it's far from being as perfect as yours! That Liquid Palisade is da bomb! What a genius invention!
Congratulations dear, you nailed it.
P.S. – I sent you an email on Monday. 😀
so cute! The Liquid Palisade made it a breeze 😉
I saw your tutorial on IG and instantly fell in love. I may have to try this myself.
So smart to do it with the Liquid Palisade! I've never tried that product…but I'd like to!
So beautiful! I love how smooth this is! Bah! Liquid Palisade looks like pure genius!
I love the color combo 🙂
I have never heard of Liquid Palisades, and this is the coolest design! I really love the colors you chose to, my favorites!
Everything about this mani just reminds me of you! It's awesome!
Love how you changed up the direction of the gradient on each nail. So sweet and lovely!
This is super cute! I really need to get LP!
I see floral for sure….and really need to look into the LP!
I utterly utterly love that gradient. And I know I'm weird, but the half moon makes me think of a bathing suit xx
Such a smart way to create this awesome look! Thanks for the tutorial!
I adore this design, and the colours are just so pretty. I tried to find some Liquid Palisade online, but the only place I could find it was on Amazon, and the people selling it don't ship to Australia. Do you know anywhere else that sells it, please? It looks amazing, and I've never heard of it before, or seen it used before. I hope you, or one of your visitors who reads the comments, will be able to help me.