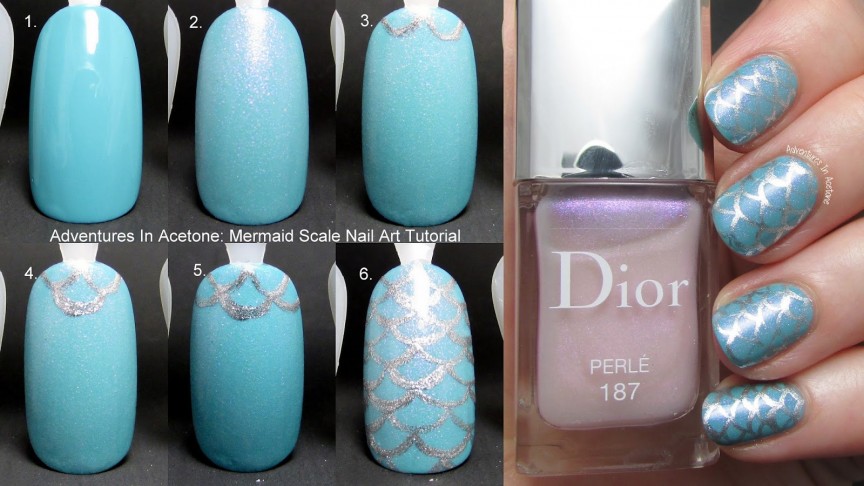
Good morning, readers! As promised yesterday, here is a simple tutorial on how to recreate the mermaid scale nail art design. If you don’t have these layering base colors of Dior Saint Tropez and Dior Perlé, you can of course use any colors you’d like the base of your scales to be! I’m just showing exactly how I did mine.
Here is a sneak peek at the step by step process. You will see full sized pictures and instructions further down in this post:
Here is a photo of the full mani in case you missed my post yesterday:
Let’s get started!
Polishes used: Dior Saint Tropez, Dior Perlé, Milani Silver Stilettos.
Tool used: striper brush. I find this kind easier for curved lines like in this tutorial but you should use whatever kind of art brush you are more comfortable with for this design.
Step 1) Paint two coats of Dior Saint Tropez on your nails and let dry.
Step 2) Paint one coat of Dior Perlé over your nails and let dry.
Step 3) Using your striper brush and Milani Silver Stilettos, paint two smile shaped curved lines. I started with the center point of the cuticle and painted outward and down from there.
Step 4) For the next layer, paint another smile shaped curved line using your striper brush and Milani Silver Stilettos, but this time use the center points of each curve from the row above for the start and end point. You are altering with each layer as you would when building with bricks.
Step 5) Again using your striper brush and Milani Silver Stilettos, finish off the second row of curved lines, going outward from the curve you did in step 4. Now, just repeat this row by row until you cover the entire nail. They don’t have to be perfect or symmetrical, just try to keep the next row centered on the one above.
Step 6) Once you have covered the entire nail with curved lines, apply top coat to seal in the design and bring the shimmer in Dior Perlé out more. (Use a thick, quick drying top coat to protect and seal in your design! I prefer Seche Vite, H K Girl Top Coat, or Poshe. Put a thick bead of top coat on the brush and gently spread it toward the tips and sides, taking great care to not let the bristles touch the polish underneath. Thinner top coats can cause streaking or bleeding of the colors and the bristles drag lines through the design.)
What do you think? It’s easier than it looks, and it may take some patience but I even loved how my right hand turned out (which uses my non-dominant hand to paint it). The best part is that you can decide how big you want the scales and you can even do this as an accent nail if you don’t feel up to doing a full mani.
What do you think? Will you try this tutorial? If you try this, or any of my other tutorials, please share your pic on my Facebook page or tag me on instagram (@adventuresinacetone)! I’d love to see them! Thanks for reading!
If you enjoyed this post, please Sign Up for email updates and you will have the latest news, reviews, nail art, and tutorials delivered right to your inbox! Never miss a post from Adventures In Acetone again. Thank you so much for reading.
– Let’s paint something amazing! –


Comments
I really love this design, might have to give it a try myself 😀
Nice tutorial! I love your blog!
Such a cute idea!! I definitely think I am going to try this out soon. Ive been dying to do a mermaid mani!