Press Sample
Good afternoon, readers! I recently received some adorable Christmas water decals from Moon Sugar Decals and realized that I had never used water decals before. They are easy to use but I thought a simple step by step may be helpful for any other first-timers like myself! Also, at the end of this post I have a COUPON CODE for you!
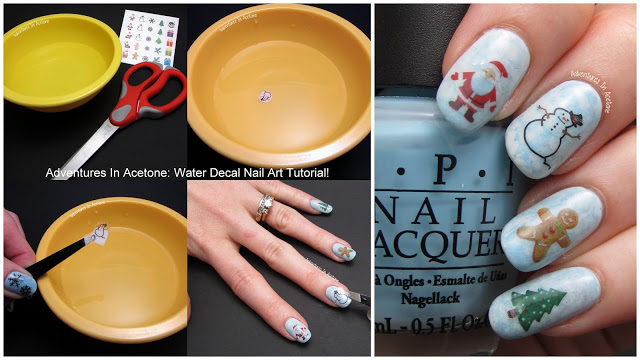
First, let’s take a closer look at my mani! I did a base of OPI What’s With The Cattitude, then used the saran wrap technique to add in some OPI My Boyfriend Scales Walls for a snowy day effect. Once the top coat on the base was dry, I applied the water decals.
Here are all of the adorable Christmas themed water decals I received from Moon Sugar Decals! (these appear to only be half of the sheet that you can order at the store link!)
Okay, let’s see how you use them! They are really easy for anyone that can cut out the images on paper!
Things you will need:
Small bowl of warm water, scissors, decals, tweezers (not shown/optional).
Step 1) Cut out the desired decal and submerge in warm water. Cut close to the design so you won’t have clear hanging off the nail. Let it sit around 30 seconds.
Step 2) Use your tweezers or fingers to take the decal out of the water. You can easily slide the clear decal off of the white paper backing now, as shown below.
Step 3) Using the tweezers or your fingers, place on the nail where you want the decal. You can slide it around a bit to get it positioned correctly while it is still wet.
Step 4) Smooth out the decal and let dry, then apply top coat to seal it to the nail. Make sure you wait until it is dry or you could smear the image.
Pretty easy, isn’t it? It’s easier to apply these to a lighter base color or white because they are a bit sheer. This was my first experience with water decals and I like how they turned out! I got some bubbles when I applied my top coat but I don’t think my decals were dry enough so it was my impatience to blame.
What do you think of this water decal tutorial? Will you be trying it? If you try this, or any of my other tutorials, please share your pic on my Facebook page or tag me on instagram (@adventuresinacetone)! I’d love to see them!
Moon Sugar Decals are $3.99 (for a 5.5″ x 3″ sheet) and come in a TON of different themes. You can also have custom decals made for $19.99 (for an 8.5″x 11″ sheet)! I love that idea!
COUPON CODE!! You can use my code 25AIA for 25% off at the store link below! This code expires on Dec 31, 2013 so don’t wait too long to try them out!
Moon Sugar Decals Links:
Thanks so much for reading!
*The water decals in this post were sent for me to review with my honest opinion.
If you enjoyed this post, please Sign Up for email updates and you will have the latest news, reviews, nail art, and tutorials delivered right to your inbox! Never miss a post from Adventures In Acetone again. Thank you so much for reading.
– Let’s paint something amazing! –


Comments
These decals are adorable!
Super cute and great tutorial!
The snowman is too cute 🙂
i love the background!
Oh my gosh! I have attached nail decals but never could get them on straight. But I wasn't removing the decals in water prior. I was trying to place it on my nail with the paper backing on then use a wet sponge or something to remove the paper. They were always crooked or not centered properly. Thank you for showing me the proper way to attach them!
Oh my gosh! I have attached nail decals but never could get them on straight. But I wasn't removing the decals in water prior. I was trying to place it on my nail with the paper backing on then use a wet sponge or something to remove the paper. They were always crooked or not centered properly. Thank you for showing me the proper way to attach them!