Good morning, readers! It’s time for another combined post of Tutorial Tuesday AND Day 2 of Black and White Week with The Digit-al Dozen! Today’s design is another Doctor Who character– the adorable Adipose!
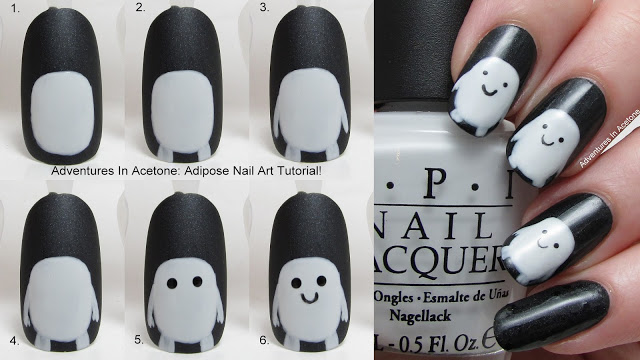
Below is a preview of the tutorial. You will find full sized pictures and step by step instructions further down in this post.

First, let’s take a look at the full mani! If you aren’t familiar yet with Doctor Who (you mean I haven’t convinced you yet to watch it with all of this nail art?!), the Adipose were adorable little creatures that would pop off of people that took a diet pill. They are pretty much made of excess fat that the pill was causing to merge into these little babies.
Here is a google image for you:


I added one coat of Nubar Black Polka Dot to my pinky but of course it barely showed up.


Want to make your own adorable fatty Adipose babies!? Here is a collage of the tutorial:

Things needed for this tutorial:

Manglaze Matte Is Murder, OPI My Boyfriend Scales Walls, Sally Hansen Black Out.

Tools: small dotting tool, striper brush. (note: after making the tutorial, the eye dots are bigger than my original mani so next time I would use a smaller dotter/toothpick to get the eyes just right.)
Step 1) Paint one coat of Manglaze Matte is Murder and let dry.

Step 2) Use your striper brush and OPI My Boyfriend Scales Walls to make a rounded square toward the tip of the nail for the body of the Adipose.

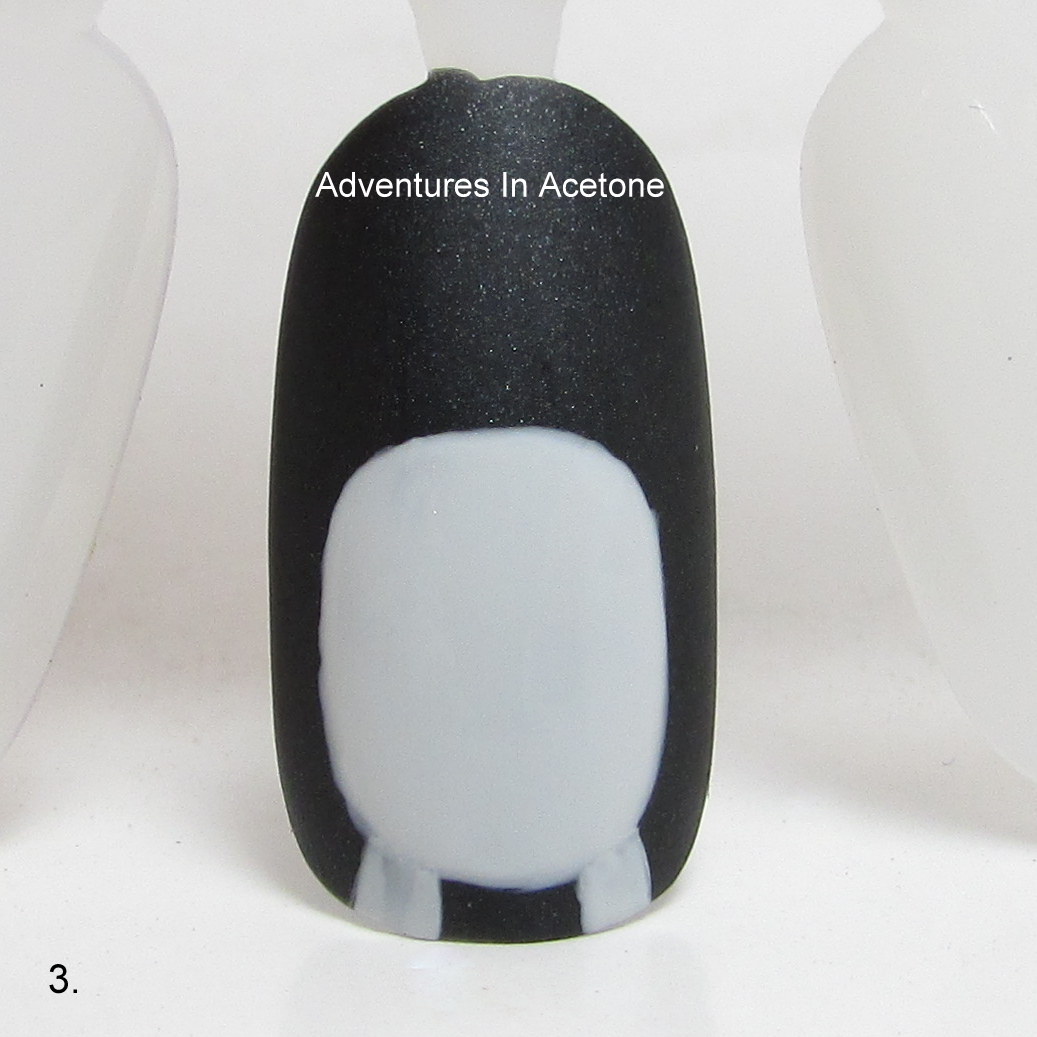
Step 3) Use your striper brush and OPI My Boyfriend Scales Walls to make 2 square shapes from the nail tips to the body for the short legs.
Step 4) Use your striper brush and OPI My Boyfriend Scales Walls to make 2 thick stripes on each side of the body for the arms.

Step 5) Use the same striper and OPI My Boyfriend Scales Walls to make little thumbs on each hand.

Step 6) Use your small dotting tool and Sally Hansen Black Out to make two small dots, spaced a bit wider than normal for the eyes.

Step 7) Use your striper brush and Sally Hansen Black Out to make a cute smile line for the mouth.

Don’t forget to add a thick, quick drying top coat to protect and seal in your design! I prefer Seche Vite, H K Girl Top Coat, or Poshe. Put a thick bead of top coat on the brush and gently spread it toward the tips and sides, taking great care to not let the bristles touch the polish underneath. Thinner top coats can cause streaking or bleeding of the colors and the bristles drag lines through the design. YOU’RE DONE!
What do you think of this cute Adipose nail art tutorial? Will you be trying it? If you try this, or any of my other tutorials, please share your pic on my Facebook page or tag me on instagram (@adventuresinacetone)! I’d love to see them! Thanks for reading!
Come back tomorrow to see the next Black and White design!
document.write(”);
If you enjoyed this post, please Sign Up for email updates and you will have the latest news, reviews, nail art, and tutorials delivered right to your inbox! Never miss a post from Adventures In Acetone again. Thank you so much for reading.
– Let’s paint something amazing! –

Comments
your tutorials are just the best! thanks for sharing!
Love it! Definitely going to try this one!
Great tutorial!
Adipose are so cute! I love this nailart! <3
These are so cute! Love your tutorials.
Adipose are my fave DW creature, and these are adorable! I'm gonna have to try these out asap!
Holy frig these things are cute. They remind me of living marshmallows. I wanna poke 'em! You did such an excellent job recreating them, your nails are so cute!!
Those are adorable! Love that nail art!!
D'awww! I lurve them! They are so stinkin' cute! Great job! Love this episode too!
Love these fat babies! So cute! I may have to try this!
So cute!! I need to watch more Dr Who!
ADIPOSE! So adorable <3
You rock at the Doctor Who nail art! Kudos!
Cuuute! I loved the adipose, the sound they made was so adorable!
So, is this BnW week or Doctor Who week? Cos I didn't get the memo!
Bawwww! They are SO cute! I haven't seen this particular Doctor Who episode, but I adore your Doctor Who nail art 😀 Your tutorial posts are probably my favorite ones, too
Cute! 🙂
i die! these are too damn cute! they were one of my favorite episodes, cute little fat bits!
These are too fricking cute!
These are so utterly adorable!
That is so freakin' cute! I haven't watched Doctor Who, I didn't even realize that there's a new version. Maybe I'll check it out. 🙂
Cute little guys! Who knew fat could be so adorable.
CUTE!
I always loved the little adipose guys. adorable mani!
It was tested on all iOS versions and did not obtained any bugs in two months of testing, and none of
the conflict of clans accounts obtained banned.