Hello, readers! I’m finally getting time today to post this week’s Tutorial Tuesday! It’s on one of the most popular designs I did during the Digit-al Dozen September Spectacular! It is super duper easy and I know that EVERY one of you can pull it off!
There is only one tool required, and the biggest key to success with this design is PATIENCE! Take your time in between layers to let them dry completely so you don’t get dragging of the hearts. Trust me on that one, I messed up in my original mani trying to speed up the process with no such luck.
You can do any colors you’d like, but the base color (Keepin’ It Teal in my version) has to be a jelly. Preferably, a sheer jelly so you don’t cover up the hearts too much. You can also do as many coats as you prefer. If you have a less sheer jelly, you don’t need as many coats as I am showing below. You can also do other shapes instead of hearts, if dots or flowers are easier for you!
Here is a preview of the tutorial, you will see full sized pictures and step by step instructions further down in this post:
From what I understand, this post by Olive View Fashion was the original “pond manicure” and I’ve loved seeing all of the variations on many blogs! Here’s a flashback to the full mani design:
Let’s begin, shall we?
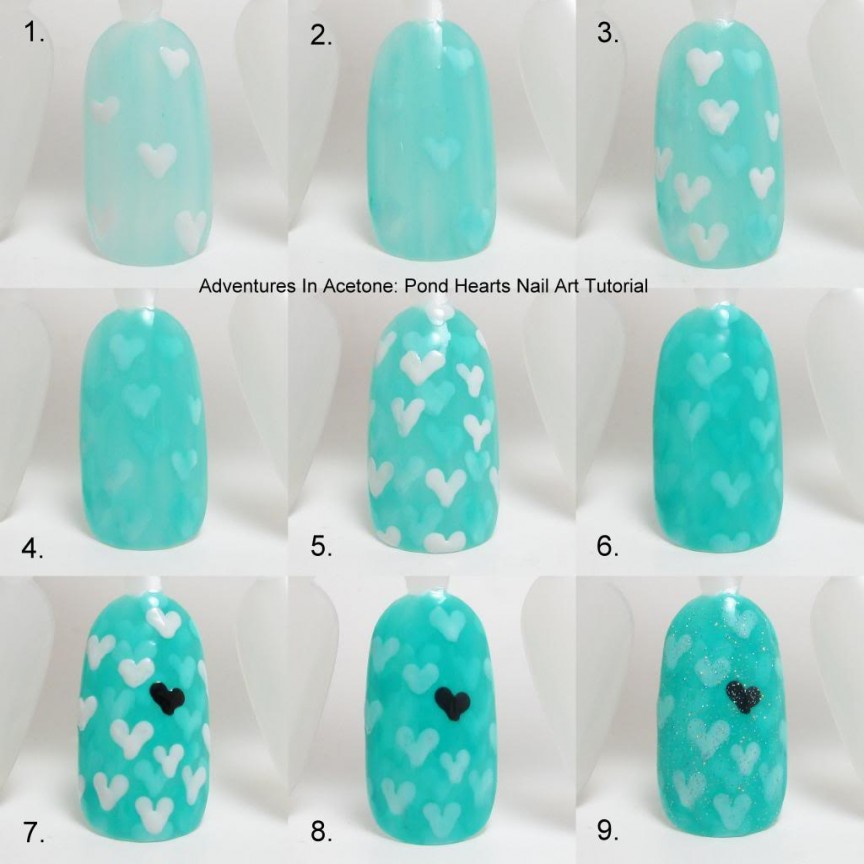
Things needed for this tutorial:
China Glaze Keepin’ It Teal, Sinful Colors Snow Me White, Wet n Wild Black Creme, China Glaze Fairy Dust.
Small dotting tool
Step 1) Paint one coat of China Glaze Keepin’ It Teal and let dry.
Step 2) Dip your small dotting tool in the Sinful Colors Snow Me White and do V shapes to make the appearance of hearts on the nail. Do these random and spread out, we will be filling in more in the upcoming steps. Let dry completely.
Step 3) Paint one coat of China Glaze Keepin’ It Teal over the hearts. Let dry.
Step 4) Again, use the small dotting tool to make white hearts randomly over the nail. Let dry completely.
Step 5) Do another coat of China Glaze Keepin’ It Teal over the hearts. Let dry.
Step 6) Use the dotting tool and Snow Me White to do more hearts randomly over the nail. Don’t worry if you overlap the other heart layers, I think it adds a nice look when they do overlap. Let dry completely.
Step 7) Paint another coat of China Glaze Keepin’ It Teal and let dry.
Step 8) Do your final layer of white hearts and add in a black one. Don’t forget to do some off of the sides or tip and overlap any bare holes. Let dry completely.
Step 9) Do your final coat of China Glaze Keepin’ It Teal. You can stop at this layer if you don’t want to add the extra sparkle and just do top coat over this.
Step 10) Do one coat of China Glaze Fairy Dust to add some added sparkle.
Don’t forget to add a thick, quick drying top coat to protect and seal in your design! I prefer Seche Vite, H K Girl Top Coat, or Poshe. Put a thick bead of top coat on the brush and gently spread it toward the tips and sides, taking great care to not let the bristles touch the polish underneath. Thinner top coats can cause streaking or bleeding of the colors and the bristles drag lines through the design. YOU’RE DONE!
What do you think of this tutorial? Will you be trying it? If you try this, or any others, please share your pic on my Facebook page or tag me on instagram! I’d love to see them! Thanks for reading!
If you enjoyed this post, please Sign Up for email updates and you will have the latest news, reviews, nail art, and tutorials delivered right to your inbox! Never miss a post from Adventures In Acetone again. Thank you so much for reading.
– Let’s paint something amazing! –


Comments
I love this!
I love these hearts! <3 kisses Judith
http://juditnailpolishblog.blogspot.hu/
https://www.facebook.com/pages/Judit-Nails/418875564885707?ref=hl
Thank you for the tutorial! Looking a it I was asking to myself if maybe I can try with stamping instead of freehand design… Because I am not so good in painting with left hand.
I think the only way is try ^_^
This is amazing! And I have the perfect polish for this ^^
This is AWESOME! I am suring trying this sometime 😀
This is so cute! Totally going to try this (and tag you!) soon 😀
Love this so much!! Will have to try this soon.
Hannahsnails11.blogspot.com
Love it! Great job on the tutorial – I LOVE the way you do them – make everything seem so easy. ♥
I love this design! I'm not sure where to buy jellies though…I don't think I've ever seen them in stores (I typically buy polish at Sally's where they sell China Glaze). Were they made in a limited collection or something? Maybe I'm just crazy, lol.
Amazing idea and tutorial! I have to try this!!
That is so great! I have a super sheer jelly that I never use because I hate having eight million layers of polish on, but this would be worth it. I want to try this soon! x
Hi again! I've recreated your design but with flowers! It would be awesome if you can check it out ^^
http://roxy-ch.blogspot.ro/2013/09/jelly-sandwich-nails.html
Sorry for putting the link here, hope you don't mind 😀
this is so cool, very pretty!
Every time I see these I fall in love all over again!
I have seen a lot of nail arts and tutorials, but haven't loved any as much as this one. <3
Please checkout my beauty & fahsion blog, The Vanity: http://tooota.blogspot.com/
i still love this so much xx
Felt inspired by your idea and just used this in my 33DC, but as flowers.
http://glam-madam.blogspot.co.nz/2013/11/20-33-crumpets-33dc-wardrobe-inspired.html
I see how to do the layering but how do you make the hearts?
Came here courtesy of Set in Lacquer and I absolutely fell in love with this technique! I just polished my nails, but I cannot wait to try this next mani!
So clever, really loving this, got to try, thanks for the very helpful tutorial!
I love this one!