Happy Sunday, readers! Welcome to all of my new followers thanks to Kayla, I am so happy to have you all here checking out what I am posting today! Since I like my spider web nails too much to take them off today, I’m going to show you how I did my penguin nails for Black and White day on the 31 Day Challenge. Here is a refresher if you don’t know what I am referring to:
I’ve had a few requests for this one. Ready to see how I did it?
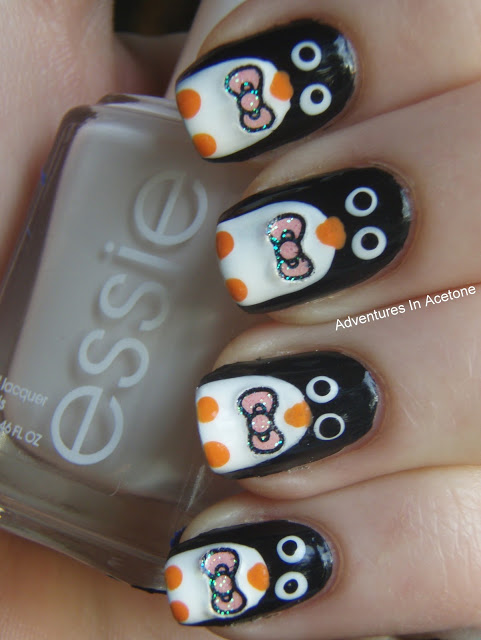
These are the polishes I used:
Wet n Wild Ink Well, OPI Alpine Snow, and OPI In My Back Pocket.
The tools I used:
Step 1) Paint your nail black.
Step 2) Using your white polish, make the belly shape. I had to do 2 layers of this to make the white opaque.
Step 3) Using your large dotting tool and white polish, make 2 eyes. (as you can see, my right dot wasn’t perfect, but it’s not very noticeable unless its this close up of a picture)
Step 4) Using your medium dotting tool and black polish, place two smaller dots inside of the white ones.
Step 5) Using your large dotting dool and your orange polish, make 2 feet. (I like to have them partially off of the nail so it’s not a full circle and more like only part of a circle shape.)
Step 6) Using your medium dotting tool and orange polish, make a beak shape. Kind of an upside down triangle. I like to make the bottom point and then drag up some more polish to make it look more like a triangle.
Step 7) Once you are sure your white is dry, use tweezers to apply a bow sticker and press down gently. You can see if my full hand picture that I didn’t let mine dry enough and some of the bows “sunk” into the white.
Don’t forget topcoat to seal and protect the design. Remember, a thicker bead of topcoat spread gently over the whole nail makes it easier to not have the design “bleed” (because bristles touch the design using thinner top coat.)
What do you think? If you try it, please share your picture on my facebook page! Also, please send me requests for more design tutorials that you’d like to see! Thanks for reading!
If you enjoyed this post, please Sign Up for email updates and you will have the latest news, reviews, nail art, and tutorials delivered right to your inbox! Never miss a post from Adventures In Acetone again. Thank you so much for reading.
– Let’s paint something amazing! –


Comments
lovellyyyyyy you are very creative i really love your blog most beautiful nail art love it 🙂 looking forward for more good tutorials
soooooooo cute! 😀
CUTE OVERLOAD!! Wow this is the best! Thanks for the tutorial!
So cuuute!
Soooooooo freaking adorable!! I have to try this 🙂 !
they look great. i would have to freehand the bows (you cant buy those little bows easily here) but other than that this is so easy to do. thanks for the tutorial.
Yay! I can't wait to try this!
And I seriously "awed" out loud when I saw that your frog tutorial nail has a friend now! <3
I love it, great tutorial!
Cutest! I hope your fingers do little penguin waddles across tables and stuff
Absolutely adorable. 🙂
This so adorable! I'm a new follower. 🙂 I can't wait to try this!
love it 🙂
this is crazy cute!
Very cute, gonna have to add this to my to do list, thanks for the tutorial! 🙂
These are too cute! 🙂
Love it!!!! Thanks for the tutorial!!!
I am in love! I definitely need to try penguin nails this winter! =D
Super cute!
So, so cute, Jacki!
Love this design! Too cute!!! Found you through Kayla, so happy that she featured your blog- you're awesome! You have a new follower and fan. 🙂
very,very beautiful, I love this blog is follow you, you can follow me.
kisses
tata-nadaver.blogspot.com
Gorgeous!! I'm going to try this right now! I love your blog 😀
Penguins are my favorite!! Can't wait to try these out, I will post the results on my blog when I do. 🙂
Hi! I used your idea for this holiday mani! <3
http://samariums-swatches.blogspot.com/2011/12/festive-penguins-in-santa-hats.html
Very cute 🙂
lol You make SOOO easy !!
love it
please go on my friends blog young and polished ( youngandpolished.blogspot.com ). If you comment/give her some advice, that would be great. thank you!
Caroline Hardy's friend.
Tell her its from had the rad!
Your nails were such inspiration, I wore them to the ISSE show..
http://youtu.be/bf85Go64RH8
…(I cited your page..enjoy)
awesome!!! I love penguins! Thanks for the tutorial!
Hi.
I'm Korean.
I'm bad at English.
I did your nail design yesterday.
Please, visit my blog.
http://seamusa.blog.me/60200661411
I want to show it to you.