Press Sample
Good morning, readers! I am really excited about the different Spring 2015 nail vinyls that KBShimmer is releasing this Friday. Did you catch my swatch post of part of the collection this weekend? Go check it out if you haven’t, I have photos of the 3 different sheets of nail vinyls as well. Of the three different vinyl sheets, I was most excited to try the swirl designs! There are three different kinds of swirls, with 2 different sizes of each kind on the sheet (64 swirls per sheet).
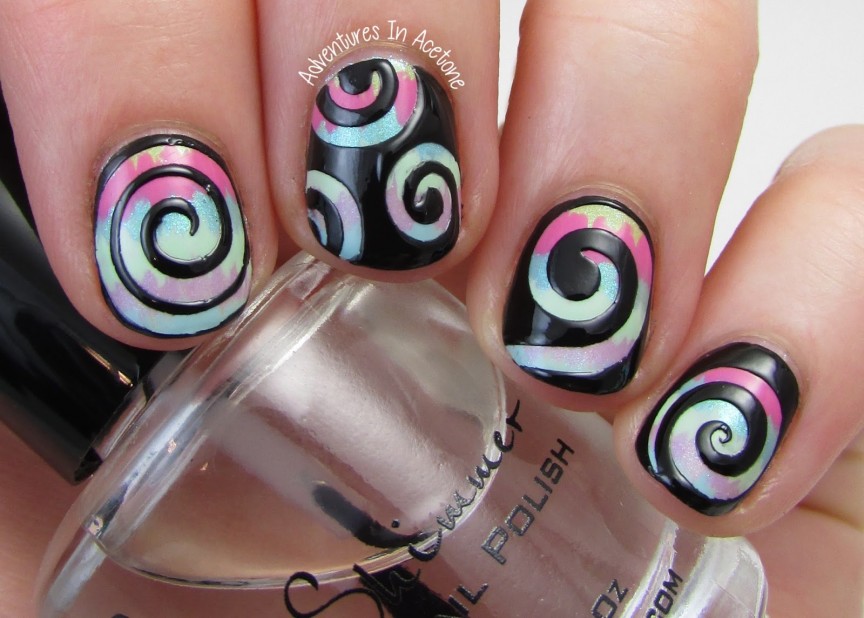
I was still wearing my final 13 Days of January challenge mani this morning but I had tip wear and was ready to take it off. Then, I realized the swirl nail vinyls would provide a perfect “extend-a-mani” solution (thanks to Sheila at Pointless Cafe for that great term) and the base could look really neat peeking through a black top color. Turns out, it worked just like I had hoped!
- As I said above, I had on a mani for the whole weekend before applying these vinyls so I didn’t have to wait for my topcoat to dry like I would with a mani I just painted. Definitely make sure you use quick dry top coat and still wait at least 30 minutes before applying vinyls.
- I used a cotton square and rubbing alcohol to wipe anything from my nails so please excuse the very dry skin below. I wanted good adhesion of the vinyl to the nail to prevent any leaking below the vinyl and messing up the design.
- Then, I grabbed some vinyls from the sheet using my tweezers and placed them on the nails, pressing down firmly:
- Index: bigger of the solid thickness swirl.
- Middle: three of the smaller swirls with the long tails hanging off of the nail.
- Ring: the bigger swirl with the long tail.
- Pinky: the smaller of the swirls that change thickness.
- After firmly pressing the vinyls down, one nail at a time I added a coat of a black creme.
- While still wet, I used my tweezers to carefully peel up the vinyl(s) on that nail.
- Then, I moved onto the next nail repeating the same 2 steps above.
- Once each nail was done, I used my cleanup brush and acetone to clean up the polish I got on the cuticles and any place I messed up the design. (this happened on some of the ones that hang off the nail because it pulled up quickly off of the nail and bumped the design).
- I didn’t add top coat but you definitely could if you wanted a level nail.
What do you think about these swirls? Which nail is your favorite? I really love that we get 3 different kinds of swirls to choose from, my favorite is probably the kind of swirl on my pinky nail. I had no issues with using the vinyls, no breaking while pulling up so YAY!
These nail vinyl sheets are releasing this Friday February 6, 2015 for $5 a sheet (64 swirls on one sheet) at their website: www.kbshimmer.com. For sales outside the U.S., visit www.harlowandco.org. Thanks so much for reading!
*The vinyls in this post were sent for me to review with my honest opinion.
If you enjoyed this post, please Sign Up for email updates and you will have the latest news, reviews, nail art, and tutorials delivered right to your inbox! Never miss a post from Adventures In Acetone again. Thank you so much for reading.
– Let’s paint something amazing! –


Comments
These look really dramatic over the colourful base. I like the variety of swirls across the nails. I've not used vinyls before … are they a one-use product or can they be reused?
Thank you! I've never tried to reuse any vinyls because they get painted over with polish and then peeled up, so I think that could cause uneven edges if applied a second time, or if the polish is still wet on them when applied again, they would transfer that onto the nail.
these look amazing..almost 3D! love it
Thanks so much!
Hi Jacki, these look great, even on shorter nails like yours (and mine). I can imagine thousands of color combinations, but summery bright colors seem like they would suit the shapes of these vinyls (at least in my mind). Neons! Thanks for the post! =)
Great idea!! Thank you!
I love the swirls! Great mani!
Thank you so much!!
Love these! I'm going to have to pick up some swirls!
thank you! You will love them!
Totally agree, pinky design with little tail is the best, but they are all super fun!!
YAY another pick for the pinky!! thank you!
Those are so cool! This looks great 😀
Thanks so much!!
Ahhhh, oh my gosh, this looks trippy and very awesome!
thank you!!
This looks very cool! It's tempting to try it.
wow this is such a cool look! its actually reminds me of fruit roll up, where you can pull the designs out of the sheet. Haha sorry if that's weird 😛
I liked the original mani but I LOVE it with the swirls!
I love the 3D look of the black over colorful base. Those designs look really cool!
This design wouldn’t look half as cool as it does now without that fab mani underneath; the juxtaposition of contrast with the horizontal color variegation against the smooth curvy lines really works well together. I suppose we’re all glad you didn’t remove your weekend mani and put these swirls on top, the design ideas this will inspire is potentially infinite. great job sweetie, very nicely done 😉