Good morning, readers! It has been forever since I’ve done a proper Tutorial Tuesday post. Sorry about that! The holidays are crazy around here and with Hailey off of school, there wasn’t time to do extra posts like that.
But, I’m back and trying to get into the groove! Since it’s pretty much FREEZING all over right now, it seemed like a great idea to do a Yeti/Abominable Snowman tutorial! This design was my VERY FIRST post with The Digit-al Dozen last December and it’s still one of my favorites!
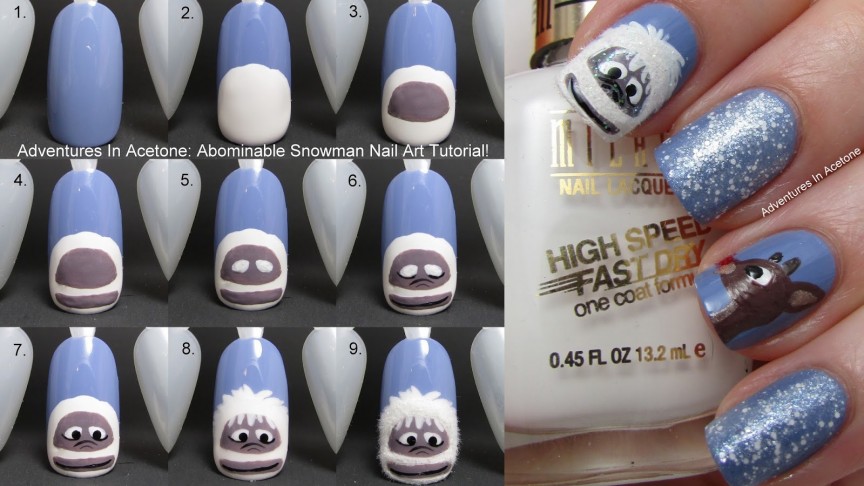
Here is a sneak peek at the step by step process. You will find bigger pictures and instructions further down in this post.
Here is a refresher if you never got to see this as a full mani:
I added white glittery flocking powder on the last step but that is completely optional. It’s a super cute guy even if you don’t make him fuzzy.
Let’s get started!
Things you will need for this tutorial:
Butter London Sprog, OPI Alpine Snow, Cult Nails My Kind Of Cool Aid, OPI Black Onyx.
Striper (or detail) brush, small dotting tool, tweezers*, white flocking powder*, soft brush*.
*Optional, only if you want to add the fuzziness on the last step.
Step 1) Paint two coats of Butter London Sprog on the entire nail.
Step 2) Paint a half circle-ish shape with OPI Alpine Snow. I did this using the bottle brush as it doesn’t matter if its a bit messy on the outline.
Step 3) Use your striper brush and Cult Nails My Kind Of Cool Aid to make a smaller half circle-ish shape.
Step 4) Use your striper brush and Cult Nails My Kind Of Cool Aid to to a thick stripe under the half circle shape.
Step 5) Use your striper brush and OPI Alpine Snow to make the eyes. I would describe these as almond shaped, but droopy.
Step 6) Use your striper brush and OPI Black Onyx to do some facial detail lines. I’ve done 2 for the nose, 2 under the eyes, and a smile for the mouth.
Step 7) Use your small dotting tool and OPI Black Onyx to make an inner eye dot on each eye.
Step 8) Use your striper brush and OPI Alpine Snow to add some hair! I’ve done lines out in all directions from the top of the head. Then, add top coat! (a thick, quick drying top coat to protect and seal in your design! I prefer Seche Vite, H K Girl Top Coat, or Poshe. Put a thick bead of top coat on the brush and gently spread it toward the tips and sides, taking great care to not let the bristles touch the polish underneath. Thinner top coats can cause streaking or bleeding of the colors and the bristles drag lines through the design.)
You can stop here if you don’t have flocking powder (which I found at my local craft store!).
Step 9) If you choose to add the fun fuzz to your Abominable Snowman, wait until your top coat is completely dry! Then, use your striper brush and OPI Alpine Snow to do a thick painting job back over just the white parts. Before it dries, use the tweezers to dump a large pile of white flocking powder over the entire nail. Carefully pat down with your finger and let sit for a few minutes. Then, use the soft brush to wipe down the nail and get rid of the excess flocking powder!
There you go! You have a super adorable and FUZZY Abominable Snowman!! What do you think? Will you try this tutorial? If you try this, or any of my other tutorials, please share your pic on my Facebook page or tag me on instagram (@adventuresinacetone)! I’d love to see them! Thanks for reading!
If you enjoyed this post, please Sign Up for email updates and you will have the latest news, reviews, nail art, and tutorials delivered right to your inbox! Never miss a post from Adventures In Acetone again. Thank you so much for reading.
– Let’s paint something amazing! –


Comments
Great tutorial! I think the snowman looks best with some added fuzzyness, makes him look even cuter 🙂
Truly amazing! I love it!
I love these nails!
amazing snowman 🙂
You did a perfect Bumble! Instantly recognizable and adorable 🙂
Totally perfect! I'm going to have to try him soon!
he looks really cool all fuzzy!
You make it seem so easy with the tutorial but I know I'd still do nothing like that even with the step by step instructions!
this is the cutest!!
This is awesome, like usual. You're always so creative. I have to try one of your tutorials, they look pretty easy.
Have a great day Jacki!
GioNails | Gio_Nails
omg this is so cute <3
this might be the cutest thing i've ever seen you do! i love him so much! the glitter bits just MAKE this!