Good morning, readers! Are you ready for another Tutorial Tuesday? Today’s post is a simple one and doesn’t take any nail art skill AT ALL! I did this mani pretty quickly and easily for the September Spectacular but had a great response and a request for a tutorial so here it is!
You only need torn pieces of a makeup sponge and striping tape. You can find striping tape on ebay as well as nail art places online. The majority of my striping tape collection comes from Born Pretty Store!
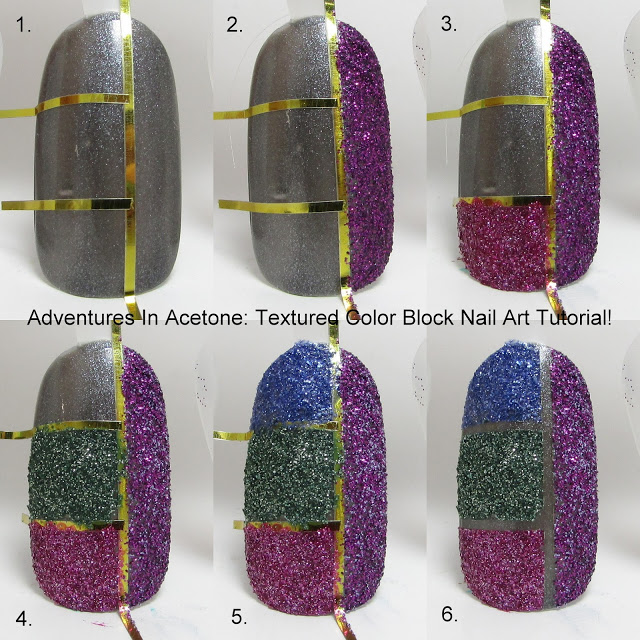
Here is a preview collage of the tutorial. You can find full sized images and step by step instructions further down in this post.
Here is a refresher to the original full mani post:
Things needed for this tutorial:
Zoyas Loredana, Chita, Arabella, Carter. Kiko 644.
Striping tape(and something to cut it with), makeup sponge (to tear into tiny pieces).
Step 1) Paint your entire nail with two coats of Zoya Loredana. Top with one coat of quick dry top coat to speed up the drying process. I’ve used Seche Vite. Let dry completely before moving on.
Step 2) Cut three pieces of striping tape and apply on the nail to make rectangular sections. Make sure to overlap a bit so you will get a clean line. Press and smooth down gently.
Step 3) Tear the makeup sponge into little pieces. Then, paint Zoya Carter directly onto one of the sponge bits and dab the sponge to fill in one of the rectangles. You can always paint directly onto the nail, but this adds more texture and dries quicker. Make sure you do this enough times for the base color to be covered in that section.
Step 4) Grab a new piece of torn sponge and do the same with Zoya Arabella in another rectangular section.
Step 5) Grab another new piece of torn makeup sponge and do the same with Zoya Chita in another rectangular section. Be careful to not overlap the tape into another section.
Step 6) Finally, do the same with the Kiko 644 to fill in the last rectangle on the nail.
Step 7) Carefully peel the striping tape up one piece at a time in the direction of the tape so you keep a clean line where there is no textured polish. Don’t forget to do the first piece you put on the nail as the last one to be pulled up.
And you’re done! No need for top coat, we want the texture in this mani!!
In case you were wondering about the pieces of torn sponge that I used, this is what they looked like. Smaller than the rectangular sections to allow for greater accuracy of filling in without messing up the other sections. It may even be easier for you to hold these pieces with tweezers while using them!
Go crazy and switch up where you do the striping tape like I did in my original mani!
What do you think of this simple nail art mani? Will you be trying it? Please post to my Facebook page and/or tag me on Instagram if you try out one of my tutorials, I’d love to see!! Thanks so much for reading!
If you enjoyed this post, please Sign Up for email updates and you will have the latest news, reviews, nail art, and tutorials delivered right to your inbox! Never miss a post from Adventures In Acetone again. Thank you so much for reading.
– Let’s paint something amazing! –


Comments
nice really 🙂
I just picked up Carter and Arabella yesterday 😀 might have to give this a go.. I feel like this would look really cool with Dahlia and/or Solange!