Press Sample
Hello, readers! Let’s talk about watermarbling! Have you tried it? Is it too hard? Is it too daunting to collect the supplies needed? This may be the right product for you! Marbleous Nails is an all-in-one watermarbling kit designed by a 13 year old named Veronica. She is too cute and I think she’s come up with a genius idea for nail art lovers!
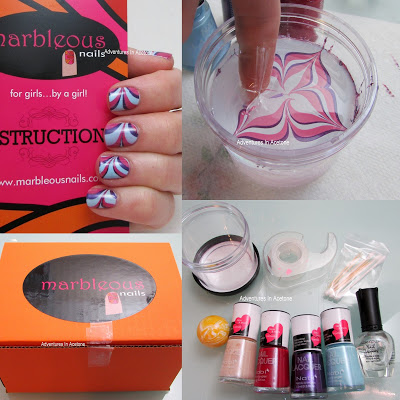
The kit comes in this cute box:
Inside the That’s Cray kit I was sent:
Included in the kit:
Marbling cup with cover, roll of tape, qtips for clean up, toothpick for swirling and making the designs, base coat, 3 polish colors to marble with, top coat, and a cute freebie(mine was this bouncy ball that my kids were very excited about)! (Not pictured: the instruction booklet).
You pretty much just need to add water. Room temperature water in fact.
The instruction booklet is very helpful!
Here is my experience with the Marbleous Nails kit:
Step 1) Apply the base coat and let dry.
Step 2) Apply one of the colors as a base color and let dry. I like to go with the lightest color or a white base when watermarbling to keep the colors bright.
Step 3) Tape around the nails and cuticles.
Step 4) Put drops of polish one at a time in the center of the water cup. They should spread out and make concentric circles of color. I like to do between 8-10 drops of color. Have all of your bottles open and do this quickly right after another. You will want to make the design before the polish has started to dry.
Step 5) Take the toothpick and make a design in the polish. I chose to do 4 swipes from the center outward to the edge of the cup, and then 4 swipes from the edge of the cup inward to the center (in between the outward swipes) to create this design.
I then dip my nail in the part of the design that I want and keep it under the surface of the water while I used another toothpick to swirl and grab the rest of the surface polish so pulling the finger out won’t ruin the design already on the nail.
Step 6) I pulled my nail out of the water and it looked like this.
After I repeated the steps again for each nail, this is what it looked like. See why the tape is helpful??
After I pulled the tape off of each finger carefully, I’m only left with this much to clean up. That’s where the qtips came in and my own polish remover. I also used my clean up brush and remover to get closer than the qtips.
And the finished result below. I added top coat before this picture. I do want to say, that the top coat included has the potential to smear your design if you don’t apply carefully. I got a bit of drag on my thumb so make sure you have a big bead of topcoat on the brush and don’t let the brush touch the nail surface.
So what do you think of this kit? Is it something for you? I think it’s perfect for beginning water marblers!
You can purchase this kit from Marbleous Nails below for $22.50.
Marbleous Nails Website: http://www.marbleousnails.com
Thanks so much for reading!
*The product in this post was sent for me to review with my honest opinion.
If you enjoyed this post, please Sign Up for email updates and you will have the latest news, reviews, nail art, and tutorials delivered right to your inbox! Never miss a post from Adventures In Acetone again. Thank you so much for reading.
– Let’s paint something amazing! –


Comments
love this post! this girl is 13 right? she's amazing!
Great idea! I hope she is very successful! Great post and review, too!
Great idea, but that price is pretty outrageous! I know that the brand of polish she's using is not high-end. I wouldn't pay that much for the kit. 🙁
I disagree. If you look at all of the items included, not just the polish(which, a cheaper brand is the way i'd prefer to go with watermarbling because it uses so much polish for each finger) and the time and effort put into the things and packaging, it's definitely worth it. She is doing the work for us so she should make money off of her time as well as the items, in my opinion.
What a wonderful idea! And so clever for such a young entrepreneur! The box is so cute..well packaged and the kit has everything you need! I love your watermarble! Just a great kit all round and a great review!
Its a great idea and amazing for a 13 to think this up and bring it to an actual product. Yes that polish isn't the best but for all that is included its a great price. I wouldn't want to use my good or expensive polishes on a water marble especially because anything new takes me a few times I'd rather use cheaper polish for that. Great product great post
OMG, i'm gonna try this!
awesome!!
this is so cute, and your marble came out perfect!!
I should get one of this my water marble always turn out to be horrible ): YOur looks perfect (;
The idea is great, but I think that if you are used to paint your nails and doing nailart it might be a bit unecessary.
What part is unnecessary? The kit or the thought of watermarble nails? I watermarble my nails occasionally even though i am used to painting my nails and doing nail art daily.
What a fantastic kit, and a clever idea! Plus your marbling is perfect 😀